Tuesday 31 July 2012

The Designer Cookie

Hi all! Sorry I've been MIA, so many things going on and not enough time for everything! For this post, I wanted to share with you my bake shop, The Designer Cookie, that closed one month ago. If nothing else, the design of the bakery is still something I will always love, and I didn't want it to die along with the business. So, I figured at least I'd post some photos of it here and share with people who may have never gotten a chance to visit when we were open.

The store was designed by Toronto designer extraordinaire, Erica Gelman of House of Design, who did an incredible job of making the shop look glamorous and girly, yet elegant and classy. Here are the pics:

Looking in from the front:


Seating and brown damask wallpaper (Stunning chairs and tables from Brocade Home):


View from the kitchen:


Pretty mixin station!


That's all for now. Hope you all like the design and even though the bake shop is now closed, it will always remain in my heart!

Monica
--Create something--

Monday 9 July 2012

Projects in progress

Happy Monday! Where has the last week gone? I kept meaning to post, but kept getting distracted. Ah, the life of a new mom. I have been working on a few projects though, so thought I'd update with some sneak peaks. 

First, the toy chest for Nate's nursery that's taking a lot longer than I had anticipated (Mainly because I can never work on it for too long at a time, always something to do!). I posted the 'before' photo in another post, and since then have filled in the holes and scratches with wood filler, sanded the whole thing, and gave it two coats of Behr Ultra Premium Self-priming paint in a colour that escapes me now. I then started to hand-paint my signature 'bubbles' on the top, which will probably take me until Nate is in college to complete. Here's a photo of the progress (Don't mind my foot in the pic, lol):


The other project I'm working on is two pine side tables I got off Craigslist for $20 for the set. The beauty of them is that they were handmade by a craftsman in Canada (I only know this because they are stamped), and are unfinished, so no need for sanding. Here they are before: (terrible photos, sorry!)


And here they are after their first coat of stain on the table tops (I used Miniwax wood finish in Special Walnut, but needs a few more coats to get the colour I want):


My plan is to sand and distress the table tops, and paint the legs white and distress them as well. I'll post the finished results of both when I'm done!

I also have a few new paintings that I'll be posting soon. Stay tuned!

Have a great night :)

Monica

--Create something--

Friday 29 June 2012

Happy Friday! And for those of you in Canada, happy long weekend!

Just wanted to share some of my new prints that I have just listed in the Rose & Cole Etsy Shop. A whole bunch of cuteness for the nursery:

Check them out at www.etsy.com/shop/roseandcole.

Have a great weekend!

Monica

--Create something--

Wednesday 27 June 2012

Rust-Oleum Cabinet Transformations Kitchen Re-do


Happy hump day! I've been wanting to blog about my kitchen transformation before I even had a blog, since my hubby refinished the cabinets himself (After I lovingly convinced him to). We used Rust-Oleum Cabinet Transformations in Espresso, which cost us only $100 to do the entire kitchen. Before we went ahead and purchased the kit, I searched all over the web to find reviews on everything from the process, the complexity, and the overall finish at the end. The general consensus was that it was pretty easy but time consuming. The beauty is that you don't need to sand anything as it comes with a de-glosser, but it did take us (him) a few weekends to complete. I would have participated, really, but I was 8 months' pregnant at the time and the hubby wouldn't let me (I swear!). This is the before pic (taken before we even moved in to the home):

And this is the after (We also installed new hardware, changed the floors and painted, in case you were wondering):
He did a pretty good job, in my opinion. The kit can be purchased at Home Depot and Lowes I believe, and cost us about $100. We got the dark kit, and had them mix it to the Espresso colour. We spend about another $30 or so on brushes and drop cloths. So total investment was about $130 for what would have cost us thousands of dollars to get done professionally. Not too shabby, considering we had already exhausted our reno budget on flooring, paint, new baseboards, new bathroom vanities and other small details. 

If you have any questions about our experience with Cabinet Transformations, drop me a line. 
Monica

--Create something--


Tuesday 26 June 2012

Tea for two

Hello! Just a quick post for today. Wanted to share with you an awesome find we picked up over the weekend; it's an antique tea cart that has made a home in our dining room. It's a nice addition as our dining room is pretty modern, but we love some antique pieces here and there. Also, since we collect antique mismatched china, we thought it would be pretty fitting. Here it is!


Not doing any work to this, it's perfect just as it is. I do want to learn a bit about its origins though, as we purchased it from a contents sale. I'll let you know if I do!

Night night,

Monica

--Create something--

Monday 25 June 2012

My New Etsy Shop

Happy Monday! Not sure if anyone is reading this yet, but in case you're out there, I have now opened up my new Etsy store. I'll be selling my original nursery prints as well as abstract art, and my mother's handmade natural stone jewellery. Here are some shots of what you will find:


Check us out and share the love! Our Etsy shop can be found at www.etsy.com/shop/roseandcole. You can also follow me on Pinterest here: pinterest.com/roseandcole.

Goodnight!

Monica

--Create something--

Sunday 24 June 2012

DIY bench makeover


I found this awesome pine bench on Craigslist for $50 and originally planned to transform it into a linen chest for my bedroom. But when I picked it up, the hubby and I realized it would look kinda awkward where I wanted it to go. So I figured I'd paint it first and then figure it out.

The before:


The in-between:


The after:


I sanded it just to get rid of the glossiness, then painted it with two coats of Behr ultra premium paint in semi-gloss (the colour is custom as I brought them a sample, but it's a stunning teal/aquamarine). Then, my best friend who happens to be an interior designer (Erica from House of Design), threw two of my existing pillows from my family room to finish the look (purchased from Etsy). I'm so happy with how it turned out. My next project is a toy chest for Nathan, my 11 week old. I got it off youbidlocal which does estate and content sales online in my area. It's pure cedar and I'm pretty excited to get my hands on it. Here's a preview of the before:


Stay tuned for that project!

Monica

--Create something--


50 shades of grey - literally

Happy Sunday! So, for my first DIY tutorial, I thought I'd jump on the trilogy that's sweeping the nation - 50 shades of grey. I'm currently on the second book (which is way better than the first so far, in my opinion), and a few days ago got the idea to turn it into a painting. No abstract interpretation in this case though - this painting is a cool, modern and literal 50 shades of grey. No, really: the painting actually consists of 50 shades of grey.

What you'll need:

-A canvas (I used a 16x20 but any size will do)
-Painter's tape (I used 1")
-Black, white and silver paint (I used acrylic) and paintbrush
-Glaze

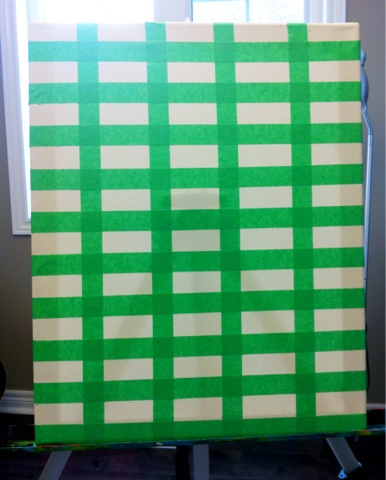
First, measure your canvas and split up in even sections so there are 50 boxes in total and attach the painters tape to create a grid:


Next, start with a blob of white paint and with each box, slowly add and mix small amounts of black paint. The idea is to go from light to dark grey, getting darker each box, until you get to about the middle where you'll reach the darkest grey. At this point, I went backwards and went gradually lighter but this time, added some silver to get different tones.


Once you're done, let dry (this is where I'm super impatient and had to really stop myself from pulling the painter's tape off.


Once dry (for real dry), pull off the tape carefully. I didn't like how perfect they looked with their straight lines, so I took my paintbrush and dry brushed the boxes with some white to create a more natural look. I then covered the entire canvas with a glaze to create a uniform look.

Et voila! Your very own 50 shades of grey painting. Right now it's sitting on my fireplace mantle but we'll probably hang it up in the bedroom. Because, well, that just seems like the appropriate place for it.


Have fun!

Monica

--Create something--


Wednesday 20 June 2012

Well hello there. I'm Monica, and I've finally decided to start a blog. I'll be posting my DIY creations, paintings and prints, antique and estate sale finds, recipes, and other cool things. Maybe even a few tidbits about my life.

A bit about me: When I was about 5 years old, my old friend and I used to draw pictures on lined paper and sell them at the park for $0.50 each. It was the Etsy of my time, and an early testament to my entrepreneurial sprit and my need to just...create. I've always been creative; constantly working on my next project.

10 years ago, I started a home business called The Designer Cookie, where I specialized in cookies, cupcakes, wedding cakes and other goodies. 3 years ago, I decided to quit my Marketing gig and open a retail bakery in Toronto. It was a challenging and rewarding experience, where I learned many things not only about business, but about people, and life.

In one week, my little pink bakery will be closing. I am sad, but ready to move on. This blog, however, is not about my bakery. It's about my need to move forward, to push on, and to keep...creating.

I hope you enjoy what I have to share.

Monica

---Create something---